Tuesday, October 27, 2015

Saving Money - Tricks and Tips

A dear friend of mine, her mother and I were all gabbing yesterday and like usual I was telling them about one of my money saving tips. They were excited and told me I really should start a blog dedicated to saving money.
Well, you know, I already have a blog and you all already like money (I presume). So why not transform my blog? I've decided that this blog will become an "I've Tried That" blog...obviously, if I post a recipe then...I've Tried It...so, it seems to me that it fits.


I'm hoping you will enjoy this new theme of my blog and to start you off I'll talk about one way that I have saved money...Ibotta.
https://ibotta.com/r/4ze8q
Let me start off by saying that I have not been endorsed by Ibotta and they haven't ask me to write about them. I am going to give you my honest opinion about this phone app.

Ibotta is an app you use on your smartphone. It's an app intended to use before and after you shop, but I prefer to use it as soon as I get home from a shopping trip. Basically, it gives you rebates on things you already buy.

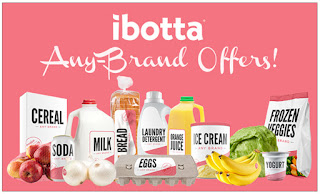
There are "Any Brand" rebates on things like milk, eggs, bread and tomatoes and more. Any Brand, meaning you don't have to buy a particular brand to get the rebate. These are my favorite since they are items that I'm always buying anyway. Yesterday I had $0.60 in rebates on tomatoes, chicken broth and onions.
https://ibotta.com/r/4ze8q

How it works: You can scour the app before you hit up the store and see if there is anything you need available with a rebate. If so, you simply watch a short commercial or answer a couple questions or maybe check out a recipe. Once finished the rebate is unlocked. Once you buy the item, you will scan the bar code (or verify with a click for item without a barcode) and scan your receipt. Some magic happens while your receipt is verified and then, poof, your money is deposited into your Ibotta account.

How to Get Your Money: This is super easy. Once you have the minimum balance you can ask for a PayPal deposit or select one of several gift cards. Boom...you're done.

I started using this app about 4 months ago and have earned back over $50 for buying my groceries. The best thing is there are rebated for other places and items, too. I earned a $5 rebate from an electronic store yesterday! I looked after I shopped and it was available! Score!

I'm not as diligent as I should/could be, but I am certain that if you use this app to the best of it's ability you could really earn back a lot of cash!

Check it out! Use this link and we'll both be rewarded (you'll get $2 and I'll get $1)!


Monday, September 28, 2015

Maple Bacon Cheddar Chocolate Chip Cups

Yes, the name is quite a mouthful and so are these!

Yes! You! Will! Love! These!

Trust me on this...most amazing thing you've ever eating! Ever!!! These little bite are the perfect size for a sweet treat, but size is the only small thing about them! They are bursting with an awesome combination of flavors!

Ya, I know there are a lot of exclamation points up there. But, these really are out of this world, especially warm and gooey, straight out of the oven.
 
Try them, you can thank me later.


Ingredients

2 1/4 cup all-purpose flour                            
1 1/8 tsp baking soda                            
1 tsp salt                            
1 c unsalted butter
3/4 cup granulated sugar                            
3/4 cup brown sugar, packed                            
1 tsp pure vanilla extract                            
2 Tbsp pure maple syrup                            
2 large eggs                            
2 cups semi-sweet chocolate chips                            
1 lb maple bacon, cooked crisp and crumbled                            
4 oz medium cheddar cheese, cubed to about 1/2 inch                            
                               
SPECIAL ITEM NEEDED

mini muffin tin


Directions                                                    
1. Preheat oven to 375. If using a good non-stick mini muffin tin, great. Otherwise, you'll need to grease the mini muffin tin with oil or butter.            
2. COMBINE flour, baking soda and salt in small bowl. Beat butter, granulated sugar, brown sugar, vanilla and maple syrup in large mixer bowl until creamy.            
3. ADD eggs, one at a time, beating well after each addition. Gradually beat in flour mixture. Stir in chocolate chips and bacon.            
4. FOR each mini muffin well take 1 tablespoon of cookie dough and fold around 1 cube of cheese. Place 1 in each of the wells.            
5. Bake for 10 minutes. Cool for about 5 minutes, enjoy!

Wednesday, September 9, 2015

Wash that Funk Right Out of My Hair

As promised I will share my homemade recipes for personal care products. Now, to be honest I had to tweak other recipes because I had to be certain the ingredient list was small, too big usually equals complicated. I hate complicated! And, long lists also (usually) mean pricey. I'm pretty frugal so I'm not about to create some shampoo that costs $20/bottle. Mine ended up costing about $8 for 1 1/2 months worth. So, pretty reasonable!

So I'll start with my easiest personal care products...Shampoo and Rinse!


Splendid Shampoo and Simple Rinse

My daughter and I tried the “no-poo” method and it turns out it really just isn't for everyone. Our hair was very oily and just gross. No amount of waiting was going to help. I just love what I came up with. The shampoo smells yummy, but leaves hair feeling a bit like straw. However, the rinse is perfect to counter that. When you are done with this two part process your hair is clean and silky soft. And, I actually have body. My hair has never had body.
Shampoo

1 cup Pure Castile Liquid Soap (I like Dr. Bronner's Almond)
1 cup canned coconut milk (I used organic BPA-free)

Rinse

2 tablespoons Apple Cider Vinegar
1 cup water


To make shampoo mix soap and coconut milk together and pour into a pump bottle. Give a quick, gentile shake before each use.
To make rinse add both ingredients to a spray bottle.
To Use: Wet hair and use 1-4 pumps to wash hair. Rinse well. Follow up with an all over spray of the vinegar mixture. Allow the rinse to sit for a few minutes and rinse well.


Wednesday, May 6, 2015

Beans Beans they're good for your heart!

The More You Eat the More You...You know the rest!

Anyway, I really love baked beans. And my son really loves baked beans. The thing is, I knew there must be a better way to make beans than busting out the can opener, dumping the beans into a pan and heating them up. I means, don't get me wrong, mom, your "baked beans" in a can were great...but, seriously, we deserved better!
So, in my quest for wonderful beans I scoured the nets and found several recipes I thought sounded great. What follows is my rendition of those many recipes and one I think you'll love!
It's easy, it's delicious and, did I mention, it's freaking easy! Oh right I did.
So here you go partners...Make these tomorrow. Do it!

First things first...Get some thick cut bacon, I do not care what kind you get, just make it thick cut and actual bacon...you know from pork! Now, throw it in a pan and cook it about halfway done. Remove the bacon and set aside on paper towels. Leave the grease in the pan.
Here's what bacon cooking looks like, in case you were unsure:


Get an onion, a bell pepper (what color you get is totally up to you. I like them all and they taste the same, in my opinion, no matter what color you use), 1 clove of elephant garlic (or 5 regular cloves) and a jalapeno (I only use half the jalapeno).
 
Wash 'em, de-seed 'em, and chop 'em up.


Now, go ahead and toss those beautiful vegies in the bacon grease and start to cook them down until they are soft-ish. Deglaze the pan while you're cooking down the onion mixture. Here's a batch that I made with green bell peppers. And another with the orange peppers. They were equally yumm!


Now, here's a secret that I learned from the Pioneer Woman's blog...Canned pork n beans. 3 cans, to be exact. There isn't anything to it, just open them up and dump them in the pan with the onion mixture

 
Stir the mixture and set it to medium heat while you measure out the next ingredients. You'll need BBQ sauce, brown sugar, apple cider vinegar, mustard (yes, whatever kind you want. sometimes I like to mix it up and use a little of 2 types of mustard), & cumin. Stir it together well.
 
Now, add it to your beans, which should be nice and hot by now...
 
 
Blend this together well and lay the bacon pieces over the top. Here's another picture for the hell of it!

Now, pop those babies in the oven for a couple hours. Really cook down the beans and everything so they are so delicious you could eat the beans for a meal! I take the bacon off the top and rough chop it before stirring it back in.


Now, here's the recipe.


Mel's Sweet and Savory Baked Beans

Ingredients:
6 slices Thick Cut Bacon
1 medium white onion, coarse chopped
5 cloves garlic or 1 clove elephant garlic, coarse chopped
1 medium bell pepper, any color, coarse chopped
1/2 jalapeno, coarse chopped
3 cans pork n beans
3/4 cup BBQ sauce
1/2 cup brown sugar
1/4 cup apple cider vinegar
2 tablespoons mustard, any type
1 teaspoon cumin

Preheat oven to 325.
Fry bacon in 12 inch skillet until cooked about halfway. Set aside to drain on paper towels.
Add onion, garlic, bell pepper, and jalapeno to bacon grease and cook until tender.
Add pork n beans and stir. Let simmer on medium heat.
While simmering, stir together BBQ sauce, brown sugar, vinegar, mustard and cumin. Pour into beans and stir.
If your pan is oven safe, top with bacon and bake in center of over for 2 hours. The sauce will thicken.
If your skillet is not oven proof, transfer the mixture to a 9x11 glass dish. Top with bacon and bake for 2 hours.
Once beans are finished baking, remove the bacon from the top and coarse chop. Add back into the mixture and stir just before serving.

Enjoy!


Tags:
beans, baked beans, BBQ, summer, cooking, vegetables, legumes, bell pepper, onion, garlic, jalapeno, pork

Saturday, April 25, 2015

How to turn 3 Pounds Ground into 3 Freezer meals, fast!

So you over there at your house. It's pretty late and your all "Shoot! I don't know what the heck is for dinner!" Then I laugh at you because you talk like my grandma. Then we just decide that wine is better for dinner anyway.
But, no. Seriously. What to do?? Run to the store and buy some food, and then come home and cook and then eat and then...NO MORE AND THEN!
Here is what you should  have done...About a week ago you were reading this one blog by Melissa and she told you how to make freezer meals. And you did.
If you take my advice now, you'll try this trick this weekend and be ready whenever lack of time strikes!

This is, hand down, the easiest way to get dinner out of the way.  I'll call it...Power-cooking, and here's what you'll need.

3 pounds ground meat (turkey, chicken or beef)
1 extra large onion, chopped
3 cloves garlic, minced

Combine all in large skillet and brown 15-17 minutes or until meat is crumbly.
Divide into 3 portions into large zip-lock baggies.
This is your base for 3 meals...

You can make tacos, chili, sloppy joes, beef stroganoff, spaghetti or italian hoagies!
Tacos:
1 TBSP chili powder
1/2 tsp salt
2 tsp ground cumin
1/8 tsp ground cayenne
1 can tomato sauce (8oz)

Stroganoff:
2 tbsp. flour
1 tsp salt
1/4 tsp black pepper
1/4 tsp paprika
5 oz cream of chicken soup (1/2 of a can)
1 cup sour cream
(Optional) 1/4 cup sliced mushrooms

Spaghetti (cheater):
1 jar marinara sauce

Chili (cheater):
1 packet chili mix
1 can corn, drained
1 can black beans or kidney beans, drains
1 can tomato sauce (8oz)

Italian Hoagies (mix well in bag before adding beef):
1 packet Italian salad dressing
1/2 cup water
8 oz mild pepper rings, not drained

Sloppy Joes (cheater):
1 Can sloppyjoe mix

When ready defrost in fridge and heat on the stovetop. If you prep on a Sunday you can leave the bags in the fridge so they are ready any day.


Saturday, April 18, 2015

Who Wants S'More?

We have a great little chiminea in our backyard. The kids love to have "bon fires" and cook s'mores. And, who can blame them? S'mores are delish, right?! Right!
Last week we had one of these nights and, as usual, there were leftover graham crackers, chocolate and marshmallows. So, after passing the crackers and chocolate on the counter a few times, the idea of S'Mores pie popped into my brain.
I had to make it, it was going to happen, it freakin' happened! Ohhh Yeah!
Oh, and my youngest child said I should name it "hashtag s'mores pie" so of course I did...
Check this baby out!

 
#S'MoresPie

Ingredients

1 stick Softened Butter
1 cup White Sugar
1 whole Egg
1 teaspoon Vanilla
1 cup Flour
1.5 cup Graham Cracker Crumbs
1 teaspoon Baking Powder
2 whole Chocolate Bars
1 cups Mini Marshmallows, divided
1/2 cup Semi Sweet Chocolate Chips

Directions

Preheat oven to 350°F
Using a stand mixer cream butter and sugar together. Add egg and vanilla and combine. Add flour and graham crackers and combine.
Using half the dough create a pie crust on the bottom and sides of pie pan. Break apart chocolate bars and line the bottom of the pie crust. Sprinkle 1/2 cup marshmallows over the chocolate bars.
With the remaining dough make balls and pat flat. Cover the pie in sections until the while pie is covered.
Sprinkle with the chocolate chips and 1/2 cup marshmallows.
Bake at 350 for 25 minutes.
Cool completely before cutting.


Monday, April 13, 2015

Cheese Please

Cheese is an amazing thing. I have never met someone who hates cheese. Ever. And if I did, I might not be able to be their friend. There is something about that ooey, gooey, stringy stuff that makes my mouth water.

This morning I was daydreaming about cheese filled pretzels and, although I have the ingredients to make them, I didn't feel like putting that much effort into cooking.  So I grabbed a few items from the store after dropping the kids off at school and rushed home to make something you're going to want to make tonight!


It's Really easy! Just unroll and pile on the ingredients.
 
Roll Up the Bread


Bake the loaf.
 
 
Enjoy!
 

Cheese Bomb Bread

Ingredients:
1 pkg refrigerated French bread dough
Italian seasoning
onion powder
1 tablespoon minced garlic
1/3 cup fresh grated parmesan (not the stuff that sits on the shelf at the store...blech!)
2 handfuls shredded cheddar or Colby


Directions:
Preheat oven according to bread dough package. Remove dough from package. Find the seam on the dough and unroll carefully.
Sprinkle the whole loaf with Italian seasoning and onion powder. At one end of dough, spread the garlic along the edge and sprinkle the parmesan cheese over garlic. Over the remaining dough spread yellow cheese (whichever you picked), but do not cover the last 2-3 inches of the dough.
Roll the dough back up, starting at the end you placed the garlic. Turn dough over so the seam in down.
Bake according to package.


Saturday, April 11, 2015

Did someone say Burger?

Hamburger.
Cheeseburger.
Bacon Burger.
Double BBQ Burger.
Burger. Burger. Burger.

Ok I got that out of my system! I don't know about you but I am always up for a stellar burger. I like them made with beef, turkey, chicken, pork and any combination of those listed meats. There is this place in San Diego, and they grind up the bacon, too...Oh.Em.Gee. they are so stinking good! I have to figure out how. In the meantime, I want to share an oldie recipe of mine I think you'll enjoy!


Blue Cheese and Bacon Burger Belt


Ingredients

2 pkg refrigerated crescent roll                            
1 lb ground beef                            
1/4 lb bacon, cooked crisp and crumbled
1-1/2 cup blue cheese crumbles                            
1 medium sliced onion, caramelized                            

Directions                       

Cook beef until crumbled and no longer pink. Drain and mix with bacon, set aside.
 
(NOTE: when following this step, do it on the cooking surface - I use my pizza stone, but make sure you do this part ON the surface that is going in the oven!)
Arrange crescent rolls in a circle with the wide ends overlapping leaving a 5 inch diameter opening in the center.
(the wide ends will overlap on the outer corners and the pointy side will point outwards)
 
Scoop beef & bacon into the widest end of each triangle being sure each triangle has equal amounts of mixture. Place onion over beef mixture and sprinkle blue cheese over that.
 
Bring the points up and over the mixture and tuck under the center of the ring. Bake at 375 for 20-25 minutes or until deep golden brown.            
Cut into 8 servings.
 
If you are having trouble following the folding, you can see pictures here: http://www.justapinch.com/recipes/main-course/other-main-course/blue-cheese-bacon-burger-belt.html?p=2


Savory Breakfast Bread-Easy Like Sunday Morning, On Saturday!

Ahh...Saturday Morning. The one day of the week we don't have anywhere to be (most of the time). I love sleeping in until whenever I like 6:30AM.
This morning I crept around the kitchen with a box of baking mix in hand trying to think up a delicious alternative to our usual Eggs with cheese and Sausage breakfast. I don't know what came over me, but I wanted to make something yum for the family this morning.
I came up with something easy and delish! I'll call it...Savory Breakfast Bread. Served with eggs, it made the perfect Saturday morning breakfast.
This bread is savory and wonderfully moist. There is no need for buttering this bread! The recipe is easy and quick to prep.

Savory Breakfast Bread

Ingredients:

2 cups baking mix
2/3 cups almond milk (or regular milk)
2 tablespoons melted butter (or margarine)
1 Sausage Link (bratwurst size), I used Trader Joe's Sweet Basil Pesto Smoked Chicken and Turkey Sausage
3 Premade Meatballs, I used Aidells Italian Style with Mozzarella Cheese Chicken Meatballs
1 Generous handful shredded cheese
1 palm-full Shaved Parmesan Cheese
1/3 Cup Chopped Green Onion

Directions:

Preheat Oven to 450.
Mix together baking mix, milk, and butter. Set aside.
Cut sausage link in half, lengthwise. Then each half in half, lengthwise again. Then cut into pieces.
Cut Meatball into quarters.
Add meat, cheeses and onion to batter and stir until well blended.
Pour mixture into a silicone (I love these because I don't need extra fat to grease the pan with) bread pan.
Bake for 35-40 minutes, until sharp knife comes out "clean" (the cheese will leave some residue on knife, but the batter shouldn't be seen).
Slice and Enjoy with eggs, if desired.


Saturday, April 4, 2015

Back to Reality

Ahhh, the good ol' Vegas trip to throw off your entire weight loss. It might have been better to wait until I was down 30 or more pounds. The 4 pounds I put back on would have been easier to deal with. But, that is what happens, you eat! And it's good.
This morning I am going to start carb cycling to get back on track. Lots of water. And then, of course, tomorrow is Easter and it's going to be a buffet of "that" type of food...You know the stuff Midwesterners bring to a church potluck. I guess I'll have a salad, thank you!
I'm hoping to create some really great recipes. Carb cycling can get boring.


Maybe I'll start Monday......LOL

Friday, March 27, 2015

Turkey Bacon, Leek and Asparagus Frittata

Losing weight, for some, often includes eating the same thing... day after day. Not because these folks aren't craving yumminess and something different. But, because sometimes people just stick with what they know. It's like, "I know Grilled Chicken Salad with Low Fat Ranch is X calories so I'll just eat that all the time."
Well, I'm here to help! Take my snack today, for example. It was so delish and full of flavor. Low Calories, High Protein...you're going to love this!

By the way, I am down 15 pounds in 26 days.


Turkey Bacon, Leek and Asparagus Frittata

Ingredients:

2 tsp Olive Oil
1/4 cup Chopped Leek
2 tsp Italian Seasoning
1/4 tsp No Salt Seasoning, original
4 slices Turkey Bacon, cooked and chopped
1/4 cup blanched Asparagus Tips
1/2 cup Egg Whites

Directions:

Heat oil to medium high in a small, non stick skillet. Add leeks and cook for about 4 minutes. Sprinkle on Italian seasoning and no salt seasoning. Stir and spread out evenly. Spread turkey bacon evenly over leeks. Pour egg whites over leeks and meat. Do not stir. Loosely cover and cook for about 3 minutes. Add asparagus over egg mixture, and allow to cook for 1 minute. Flip frittata over and allow to cook an additional 2 minutes.

Enjoy!


Sunday, March 22, 2015

Honestly. for me, the hardest part of dieting is missing the crunch of a crispy potato chip. Now, I've given up sugar AND salt (as much as possible). So what's a girl to do when she wants a crunchy chip but no salt? Well, she makes her own. I've been working on a yummy Kale Chip so good that I won't miss the salt. I came up with these and they, truly, are delish.

Crispy Crunchy Kale Chips

Ingredients

1 Bag of prewashed Kale or 1 head of Kale
2 TBSP Coconut oil
2 TBSP no salt seasonings blend (like Mrs. Dash). I like to mix 2 flavors.

Directions

If using a head of kale, wash well, cut ribs off and cut into chip size pieces.
Lay kale on a towel and let it air dry. Be sure most of the water is gone.
Preheat oven to 300.
Place kale in a large mixing bowl, drizzle coconut oil over the kale. Toss to coat the kale. Sprinkle salt free seasoning and toss to coat, again.
Spread kale in a single layer on a cookie sheet and bake at 300 for about 10 minutes. Turn over, as much as possible, and continue cooking for about 7 minutes or until as crispy as you like.

Saturday, March 21, 2015

So one day you're at home craving Fettuccini Alfredo. But you are NOT craving a crap load of cheese and half and half, let alone the calories and fat...Doesn't sound good at all.
So, you head over to the market and browse the isles in search of stuff that you could make into vegan Alfredo sauce.
That's what happened to me today. The thing is what I set out to create and what I actually made were very different from each other. So I call this one:

Creamy Twisted Zucchini

Ingredients

4 Tbsp Coconut Oil     
1 Small Yellow Onion, chopped       
2 Tbsp Garlic, minced  
1/2 Tbsp  Fresh Rosemary, minced         
1 Tbsp Fresh Basil, minced
1 medium Roma tomato
1/3 Cup Raw Mixed Nuts, chopped fine          
2 Tbsp Cornstarch              
2 large Zucchinis        
1 cup, Unsweetened Plain Almond Milk           

Preheat oven to 350
In a 12 in. skillet heat oil to medium high. Add onion and cook for about 5 minutes. Add garlic and cook an additional 3 minutes. Add in fresh herbs, continue cooking about 1 minute. Add chopped tomato and nuts and cook for 2 minutes.
In a small container, mix almond milk and cornstarch, add to skillet and stir well. Let mixture thicken while you prep zucchini.
Using a spiralizer (this one is my fave b/c it's simple: http://www.pamperedchef.com/pws/gourmetrenee/shop/Cook%27s+Tools/Spiral+%26+Slice/1136 )
spiral slice the zucchini in place in bottom of casserole dish.
Pour the cream mixture over the zucchini and spread evenly.
Bake for 45 minutes.

Serves 6. Each Serving contains:
Cal: 212
Fat: 17g
Sodium: 40mg
Sugar: 4g


Thursday, March 19, 2015

Spring Has Sprung in San Diego

With the weather heating up I have been searching for a yummy frozen treat. In my search I discovered Zipzicle. These little guys are great! You can make your own frozen push up treat mix, pour it in and zip the top for a cool push up to beat the heat.

Now, what is a girl supposed to put in there? Fruit juice, sure. Yogurt, sure again. But what if you are a smart girl who loves to be healthy and wants her figure back??? Well, you make the recipe below!

Creamy Banana Push Up


5 Servings

1 Scoop Xyngular Lean
2/3 Cups Coconut Water
1/3 Cup Water
2 Ripe, Medium Bananas

Place all ingredients into a blender and blend until smooth. Divide into 5 Zipzicles or into popsicle molds. Place in freezer until...well, frozen. :-)

Enjoy!

Each pop has the following:
Calories: 54
Fat: 0
Sodium: 9mg
Sugars: 7g
Carbs: 12g


Wednesday, March 18, 2015

I recently decided to shed some pounds. I've been struggling with my weight for a couple years now...after marriage (sound familiar?). I need to drop massive pounds! So I have found these wonderful supplements (all natural and safe...no yucky stimulants) that have helped me jump start the weight loss. I have lost 10 pounds in 2 weeks. 8 pounds was lost in my first 8 days. I have been creating lots of yummy, whole food recipes and am loving this journey...something that is not always easy to say when loosing weight.
Yesterday was a cheat day for me. I was craving something sweet, but sugary foods do not appeal to me any longer. I created this wonderfully creamy and decadent ice cream. It was simple; real foods seem to be more simple, don't they! Follow along with me on my journey!

Vegan Coconut Cacao Ice Cream

With only 5 ingredients and no need for an ice cream maker, you're going to fall in love with this creamy and delicious treat!

Ingredients

1 can full fat coconut milk
1/4 cup cacao nibs
1 tbsp. honey
1 tbsp. agave nectar
1 tsp vanilla

Directions

1. Place coconut milk and cacao nibs in a medium saucepan. Bring just to a boil over medium heat. Reduce heat to a simmer and allow the cacao to infuse for 10 minutes over low heat, stirring occasionally.
2. While the cacao is infusing, add the honey and agave toward the end of the process.
3. Strain the mixture over a blender. Add back only 1 tbsp of the nibs to the blender along with the vanilla. Blend the mixture until the nibs are tiny.
4. Pour the mixture into a small, parchment lined casserole dish. DO NOT pour into the dish without the parchment, it will stick and you'll be sad. :-(
5. Put the mixture into the freezer for about 30 minutes. Stir and return to the freezer for another 30 minutes. Freeze again until your desired consistency is reached.


If you are interested in learning how I'm losing weight and feeling great visit this site. I love questions, so ask away! Make sure you enter my name: Melissa Baldan so I can get you the information you need!
http://xyng-one.com/

Thursday, February 19, 2015

Sweets for the Sweet

Strawberry Sweet Treat

Enjoy the Flavor of Summer Anytime


I've been on a mission to develop something sweet and satisfying. This first flavor will really rev up the fresh flavors of the upcoming seasons! It is a bit time consuming, but the outcome is, oh so very, worth every bite! Hope you enjoy! Please share the link. :-)


Buttercream Frosted Strawberry Cake
with Hibiscus Honey Cream

Ingredients

FOR STRAWBERRY CAKE

2 cups granulated white sugar
3 ounces strawberry gelatin, package
8.8 ounces salted butter
4 medium eggs
3 cups shifted cake flour
2 1/2 teaspoons baking powder
1 cup whole milk
1 tablespoon pure vanilla extract
1/2 cup fresh strawberry puree

FOR HIBISCUS HONEY CREAM

1 1/2 cups heavy whipping cream
3 tablespoons raw honey
1/2 cup dried hibiscus Flower

FOR BUTTERCREAM FROSTING

3 cups powdered sugar
1 cup unsalted butter, room temp
1 teaspoon pure vanilla extract
2 tablespoons whole milk
 

For Strawberry Cake

Preheat Oven to 350. Prepare 2 9 in cake pans. In a large bowl cream sugar, gelatin and butter until fluffy. Add in eggs, fully incorporating after each addition. Mix flour and baking powder. Add to butter mixture alternatively with milk. Finally, add puree and mix thoroughly. Divide mix into both pans and bake for 25-35 minutes (my oven took 34 minutes) Allow cake to cool for 10-15 minutes in pan before removing to wire cooling rack.

For Hibiscus Honey Cream

While cake is cooking, bring heavy cream and honey to a boil. Remove from heat. Add hibiscus to cream mixture, cover, allow to steep for 20 minutes. Strain out hibiscus flowers and allow cream to completely cool in refrigerator.

For Buttercream Frosting

Beat together on powdered sugar and butter. Add in vanilla and mix well. Last, add in milk a little at a time until a nice fluffy consistency is reached. You may not need all the milk. Do Not Frost Cake Until it is Fully Cooled.

To Build Cake

Place first layer of cake on serving dish. Use 1/2 frosting to make a nice middle layer of frosting. Place second layer of cake and frost only the top of cake. Drizzle cooled cream over the cake.


Sunday, February 1, 2015

First Up...Baked Biscotti Custard

Taking a bow to my favorite dessert, tiramisu, I mixed things up...A Lot! This revamped version of the dessert is delish.
My opinion though...Not over the top delish, but yummers worthy. Try it out, however! I think you'll like it.


Baked Biscotti Custard

8 Almond Biscotti Biscuits
3/4 Cup Sheridon's Coffee and Cream Liquor
1/4 Cup Amarula Liquor
8 oz mascarpone cheese, room temp
3 Medium Eggs, separated
4 Tbsp white sugar
To taste - Sweetened Condensed Milk and Coco Powder


Preheat Oven to 375.
Place biscotti in a single layer in a small pan, combine liquors and pour over biscotti. Set aside.
Place mascarpone into a medium mixing bowl and stir until creamy.
Separate eggs into two small bowls. Into the yolks add 2 tbsp. of sugar and mix with fork until creamy. Add to the mascarpone cheese.
Into the whites add sugar and beat with electric mixer until peaks form. Add to mascarpone cheese mixture and blend well. Set aside.
Set the liquor soaked biscotti into the bottom of a bread pan (silicone is preferred for easy removal). Pour the cheese mixture over the top. Bake at 375 for 20-25 minutes, or until light golden brown on top.
Cool slightly and turn out onto a serving platter. Cut into bars, drizzle with sweetened condensed milk and shake coco powder on the top.

Thursday, January 29, 2015

DESSERTS!!!!!  CHOCOLATE!!!!! SWEETS!!!!!!

Just Bring it Already

 
Ok, seriously. How many times have you been eating ordinary food only to think..."This is boring, bring on the goo stuff, already!" For me, it's about 3 times a day. Seriously. Why eat anything else? I mean we can survive on dessert alone, so let's just do it!
I do have to admit, I would get bored with sweets, too. But, I have really been contemplating baking recently, a lot.
 
I'm ready to do this yummy-sweet thing!
I am pretty sure I want to start with something OVER-THE-TOP delish! Jasmine or Green Tea or Lavender or Rose...I don't know what it will be, but it's going to be great!


Wednesday, January 28, 2015

Last night I had my cousin over for dinner. It had been about 20 years since I had last seen her. I just love how a good meal and a dinner table can put to rest any uneasiness. I love my family and I very much enjoyed reminiscing and catching up!
I made a wonderful Chicken Picatta, but it was a tad bit too lemon-y. But, that isn't what I wanted to tell you guys about today. Instead I wanted to share my love of bread!
BREAD...the awful, delicious, fattening (butwhogivesa), fluffy bread! If you have a good recipe and thing bread machines are the devil...stop reading now!
My problem with bread machines was finding a simple recipe that was actually soft like store bought bread. The next solution was a box mixed...How in the world can anyone justify spending $3+ on a box of bread machine mix, when you can buy a loaf - already made - for around the same cost? For me, getting a bread machine was for helping me save money, not spend the same.
The next problem was that the recipes others posted online always made very tough bread, or the recipe was too confusing. I like food to be delicious, but first and foremost, easy! if it isn't easy, who is going to make it?
So, after reading dozens of recipes and trying dozens more I finally came up with a simple, but wonderfully soft bread machine recipe. You simply must try!

White Bread for Bread Machine

1 teaspoon dry active yeast
3 tablespoons white, granulated sugar
1 cup hot water
3 cups white, all purpose flour
1 teaspoon salt
1/4 cup vegetable oil

Plug the bread machine on and set to light crust, ultra fast, 1.5lbs. DO NOT START.
Add yeast, sugar and water to the bread machine, stir slightly. Allow to sit for 6-12 minutes. This will get very foamy.
Add the flour and salt, then the oil. Press start.
Remove from machine as soon as it is finished. Allow to sit in pan for 10 minutes before removing to a cooling rack. Allow to cool before cutting.

NOTE: While the initial mixing is happing I like to scrape the sides to be sure all is well incorporated. Once nothing is sticking to the sides any longer, I leave it alone.

VARIATION:
Italian
Add 1 tablespoon Italian Seasoning to the yeast/sugar/water mixture.
Add 1 1/2 tablespoons minced garlic and 3/4 cup shredded parmesan after the oil.

Onion Bread
Add 1/2 packet of onion dip mix and 2 teaspoons dried dill when adding flour.


I love to hear other Add Ins, if you have a suggestion let me know! Share your results.

Enjoy!


Tuesday, January 20, 2015


Wow...Dinner tonight was just amazing!

I made this wonderful Creamy Lemon Chicken Pasta

It was really out of this world. Bursting with flavor and super quick and easy! Now, I should warn you...I make up a lot of my recipes and I don't tend to follow any in particular so writing them isn't always super easy. If you have zero kitchen skills, you probably won't be able to make my stuff. But a fat chick who likes to eat is bound to have, at the very least, basic cooking skills...right!?

Creamy Lemon Chicken Pasta

2.5 tbsp. butter, unsalted, divided
1 pound thin cut skinless boneless chicken breast
1 box pasta
1 lemon, zested and juiced
1.5 cups extra heavy whipping cream (DO NOT SUB)
large dash of salt
1 teaspoon minced garlic
1/2 cup shaved parmesan cheese

1. In large stainless skillet melt 1 tbsp. butter over medium-high heat. Reduce heat to medium and add chicken. Cook until nearly done.
2. Meanwhile boil water for noodles and cook noodles. Drain and place in serving bowl. Also, zest the lemon and then cut in half and juice. Set aside.
3. Once chicken is nearly done, remove from pan, slice, and return to pan with additional 1/2 tbsp. of butter. Sear to finish  cooking, add chicken to the top of noodles.
4. In the same pan add the last tbsp. of butter and scrape the chicken drippings up. Add whipping cream and bring to barely a bubble. Add large dash salt and garlic. Combine well and add the lemon zest and juice all at once. It will start to thicken immediately, so be sure to keep mixing well.
5. Add in cheese and cook for just a minute or until cheese is melted. Pour over noodles. Sauce will thicken as it cools.
6. If desired, add in some Italian parsley or Basil (pictured).

Enjoy!

Monday, January 19, 2015

That BBQ Pulled Chicken didn't turn out so good. I wanted to like it, but the sauce was really thin. I ended up draining the meat and using a bottle of bbq sauce to make it good. My son loved it! He thought it was the best ever. I, did not. So...I'm not going to bother sharing the recipe.

Tonight, however...Wow! Dinner was fantastic. It was gone before I could even snap a pic, so you'll have to rust me that it presents nicely, too!

Chicken, Bacon and Onion Tart

1/2  package frozen puff pastry sheets
6 smoked bacon slices
1 red onion, sliced (don't separate)   
3 extra large eggs
3/4 cup heavy cream
Couple dashes kosher salt
Couple dashes black pepper
Large handful freshly shredded Colby or Medium Sharp Cheddar  
1/2 pound cooked chicken breast cutlet  
1 cup coarsely chopped green onions
1 cup shaved Parmesan cheese (+or- to your taste)   
 
 
1. Preheat oven to 400. Remove 1sheet of puff pastry and set out to thaw. Return remaining to freezer. 
2. Cook bacon until crisp. Meanwhile, place full onion slices on baking sheet and place in oven to cook until needed.
3. Beat eggs, cream, salt and pepper.
4. Place the pastry dough in a pie pan, the squared edges will hang off - that is good.
5. Sprinkle half the bacon into the crust and cover with Colby. Cover cheese with 1/2 of the cooked red onion. Add chicken, being sure to evenly disperse filling. Add remaining red onion and green onion.
6. Pour in cream mixture. Fold over the squared edges and sprinkle parmesan cheese and
the remaining bacon over top.
7. Bake at 400 for 45 minutes.
 
This was served with a spring mix salad with Blue Cheese, apples and a vinaigrette.
Hope someone else tries this...share a photo!
 

Tuesday, January 13, 2015

I did make that 3 ingredient Pulled Pork and it was delish!

Here's what you'll need:
3ish pounds of pork roast (I used pork cuts made for carnitas)
1 bottle BBQ sauce, whatever kind you like
1 can cola

Place all items in the crock pot. Cook on low for 8 hours. Remove meat, discard fat and shred with 2 forks.
Add about 4 ladle-fulls of the sauce to the shredded meat. Serve on hamburger buns. YUMM


This fat chick and her family went on a 4 day cruise from Long Beach to Ensenada with a stop in Catalina. I have some marvelous food while on the ship! Tonight I am not going try any of the menu items from the ship but I am going to make up another BBQ sandwich!

Tonight I think I'll make pulled BBQ chicken.

In my crock pot I have the following:
4 skinless, boneless chicken thighs
1 can manwich
1 teaspoon liquid smoked
1 can root beer

I'll let you know how it goes!

Tuesday, January 6, 2015

I love when things that are really easy turn out really good! Like last night, for example, I made these super easy hamburger tacos that my family gobbled up!
 
It was so easy to make. I took a picture with everything I cooked, but I'm not going to talk about the rice because it cooks in a pan and is self explanatory.

 
I found this Old El Paso taco kit. It came with shells, "taco sauce" & taco seasoning. So, in order to make a basic hamburger taco filling I simply put the following into a slow cooker:
From the kit: taco seasoning, taco sauce
I added 1 can of diced tomatoes with chilies.
I mixed those 3 ingredients together, added the ground beef and let it cook, on low, for 6 hours.
At 3.5 hours I mixed it up and broke up the beef. Then let it cook the rest of the time.

It was really good and so easy!


Tonight I have a 3.5 pound pork roast in  the crock pot on low with a bottle of BBQ sauce and a can of Pepsi! I'll let you know how it goes!

Friday, January 2, 2015

I love to eat. That's it. I'm not some fancy shmancy Food Stylist. I don't know how to take amazing food pictures - AKA: Food Porn.
But, what I do like is to create mouthwatering recipes that REAL people can make. And real people like to eat. I prefer not to use hard to find ingredients. I want to know that a regular Jane can walk into her local store (maybe a farmer's market or, occasionally, an organic type grocery store) and find the items she'll need to recreate my recipes.

Also, I love my family. I'm really proud of my kids! My husband is amazing! My parents...well, you know they are mine and I love them. My in-laws are they type anyone would hope for.

I avoid TV and only watch a few shows, on DVR or Movies. But, my favorite genre is Horror.

I'm not a great writer, but I want to keep this blog Down to Earth and real. I want you to get to know me and I want to know you! I'll share stories, frustrations, recipes! And, we'll eat!

This is my blog - my confessions.

Confessions of a Fat Chick
            Food For People Who Like to Eat